Faculty

A "live" site in Canvas is for course sections on the schedule for the current quarter and has enrolled students listed in the Roster.
When you activate a live site, you will be guided through the steps to create your live Canvas course site.
If your course has more than one section, you have the option of creating a Canvas site for:
Each section (Individual)
- Pros: Fewer students are in each site and you can customize the course site to the needs of students in each section.
- Cons: You will have to send out the same Announcement, monitor all of the discussions, and make edits to each course site.
Multiple sections in one site (Grouped)
- Pros: You only need to send out Announcements once, monitor only one Discussion, and make changes to your course site once.
- Cons: Students may get confused if the combined course site includes both on-campus and fully online course sections because the number and type of assignments, tests, and discussion may be different. Discussion threads can get to be quite overwhelming with so many students. However, you can set up groups to mitigate that issue, if desired. That way, students in each section can have their own Discussion forum.
Activate your live site in MyPortal
Written Instructions
Download 'How to Request a Canvas Site' (pdf)
- Log into MyPortal (https://myportal.fhda.edu)
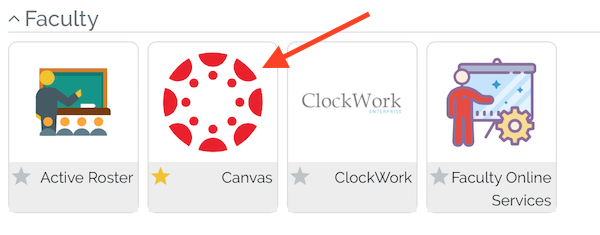
- Click on the Apps located in navigation on the left
- Click on the Canvas icon
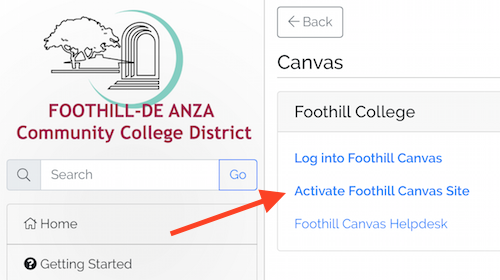
- Click on "Activate Foothill Canvas Site"
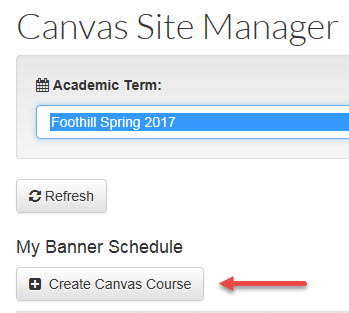
- Click on "Select a Term" drop-down menu
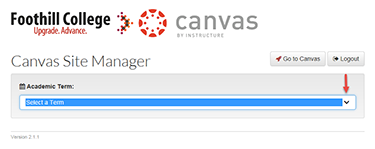
- Select the appropriate term
- Click on "Create Canvas Course" button
- Click on the drop-down menu
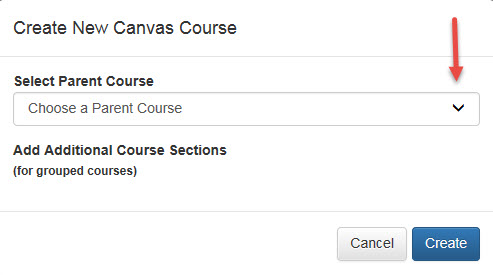
- Select one of your class sections to be the "Parent" course that you want included in your live Canvas site.
- Follow the instructions based on the type of Canvas site you would like to create,
Individual or Grouped. If you have only one section then follow the first set of instructions
(Individual).
Create a new Canvas course site for EACH section (Individual)
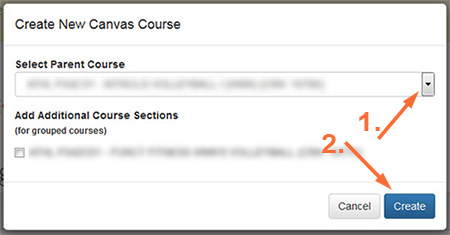
- Click on the dropdown menu then select the Parent Course from the list
Note: Do NOT check any of the boxes next to the courses that are shown below "Add Additional Course Sections".
- Next, click on the "Create" button.
Group all of the sections into ONE Canvas course site (Grouped)
Check the box to 'Add Additional Course Sections' if you want your parent course site to include more than one section.
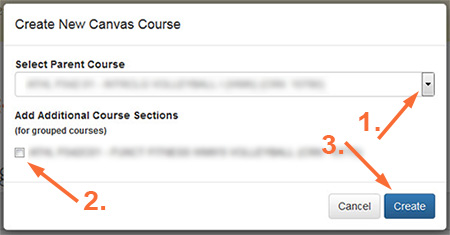
- Click on the dropdown menu then select the Parent Course from the list
- Under "Add Additional Course Sections" check the box next to each section that you would like to add to the parent course.
Note: Make sure you do NOT select a different course otherwise you will end up with a Canvas course that contains more than one course instead of different sections.
- When you are done adding sections, click on the "Create" button.
- Click on the dropdown menu then select the Parent Course from the list
- Next, you will see a spinning arrow next to "Creating Course 0%"
- Please be patient because it takes a minute or so to set up your course site.
- Wait at least one minute

- Confirm submission of your request
- Click on the "Reload" button
- Choose academic term
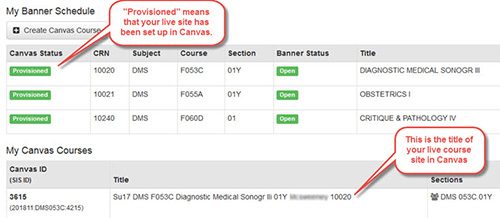
- Look for "Provisioned" (green rectangle) in "Canvas Status" column for your course. Provisioned means that the status of your course is live.
- If your course site is not visible on your Canvas Dashboard
- You can import the course material from a prior quarter or from a development site
using the Canvas Course Import tool.
How do I copy content from another Canvas course using Course Import tool?
NOTE: If you're copying a course you taught live in a prior quarter and created Zoom sessions in Foothill Zoom then make sure to select the option to "Selecct specific content" and uncheck the box next to Calendar Events.
If you select "All content" then your prior Zoom meetings will appear in your Canvas calendar where your students will see them and you'll have to delete them one-by-one.
How do I select specific content as part of a course import?